


I know it’s mid-December, which means it’s wayyy into Christmas season… but I’m not fully there yet. My Fall baking is always delayed because October is a hellscape of raving mad work hours every year, leaving very little time for apple cakes, pumpkin bread, and other warmly spiced autumnal delights. So I’m rarely ready at the end of November to jump into winter holiday baking. Therefore, I am happily toiling in Fall-ish recipes a little longer and I’m not the least bit sorry about it; this absolutely *plush* Butternut, Olive Oil, & Bittersweet Chocolate Cake is just right for this chilly week. But I swear, holiday cookies soon!
Food52 published an intriguing Kabocha, Olive Oil, & Bittersweet Chocolate Cake last year that I became immediately smitten with. While I enjoy pumpkin bread/cake, I have a narrow window each Fall when I crave it, and then I’m over it pretty quickly. The flavor, texture, and spices are similar, but it was different enough to capture my attention. (Also, it is positively loaded with chocolate, and that has no seasonal expiration.) I am convinced that generally oil-based loaves > butter loaves, whether we’re talking about banana bread, pumpkin cake, or even citrus cakes (with the exception being buttery pound cake) because their texture is so tender, and olive oil in particular imparts such a beautiful perfume. And this recipe packs a second dose of olive oil in the glaze, which I don’t believe I’ve encountered before: a simple icing made by whisking together confectioners’ sugar, water, and olive oil. It’s important to use a good-quality oil here because the flavor is front and center, and it complements the cake beautifully.
As for the star ingredient, I wanted to swap out the kabocha squash for butternut, mostly out of laziness, but also because kabocha is not as widely available. Seeing as how butternut squash is sold in pre-cut cubes, that choice was a no-brainer. (There are ingredients that I’m perfectly willing to put extra time and effort into prepping; cutting up whole winter squashes is not one of them.) I wondered if this was an even swap, as squashes have varying degrees of water content; reading further down in the Food52 recipe, it does say that if one chooses to use butternut squash, it’s necessary to drain the excess liquid, which was easy enough to do with a fine-mesh sieve.
I baked it again last week to see if I would like it as much as last year, and sure enough, it was again exquisite. Also mirroring last year, the loaf took quite a long time to bake, and I thought I over-baked it both times, but it was very tender and moist all the way through, so I think it’s a pretty forgiving recipe. (I’m having some oven temperature issues, so it did take excessively long to bake the second time, but I think somewhere around 90 minutes is generally correct.) Although it was great and my tasters snarfed it up, the one thing I wanted to tweak was that the loaf seemed a smidge greasy. Sooo I made a third loaf and decreased the olive oil from 255mL to 225mL, which is supposed to be a little over 1 cup by volume, but measures as precisely 1 cup in my liquid measuring cup (ugh, that’s why weight is more accurate– but the original recipe calls for 255mL, which is a lot more oil). Reducing by 30mL was just right for a moist, flavorful, fluffy, and not-at-all greasy crumb. Plus it clocked in at 95 minutes of oven time. It’s hard to test for doneness because of all the chocolate– each time I thought I had overbaked it, but it really needed the full 90 minutes (and then some on the third attempt). I kept thinking the top edges were over-crisped, but don’t fret if yours looks that way because the olive oil icing will soften the top of the loaf. I also reduced the amount of olive oil in the glaze to about 2 tablespoons because while I loved the distinct olive oil flavor, I found it to be a little too strong, plus it had a slight “sweaty” sheen of oil.
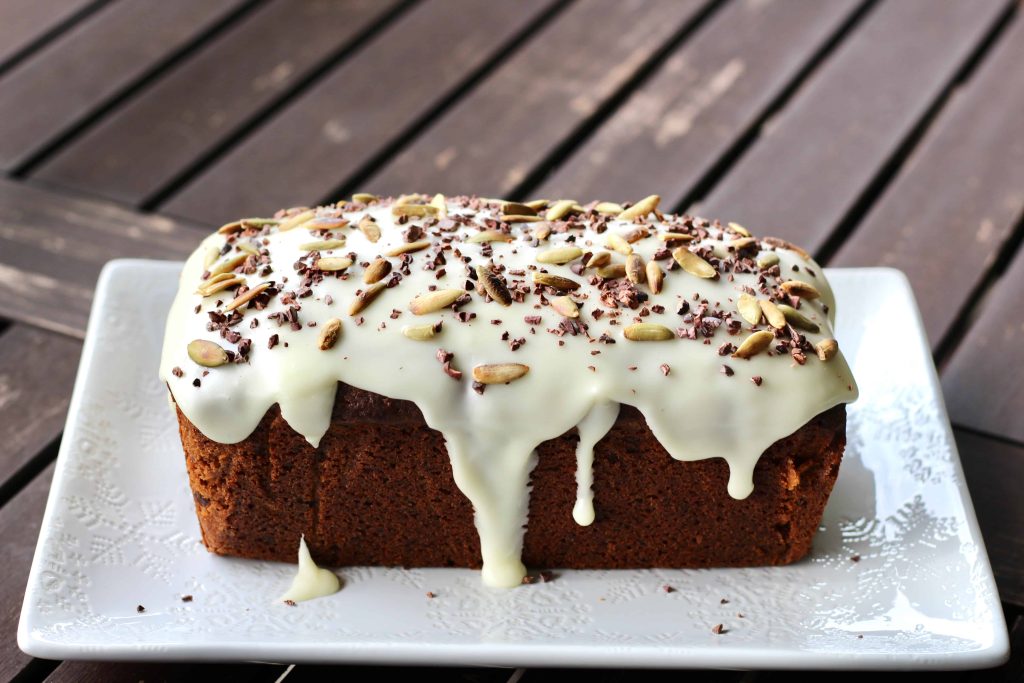
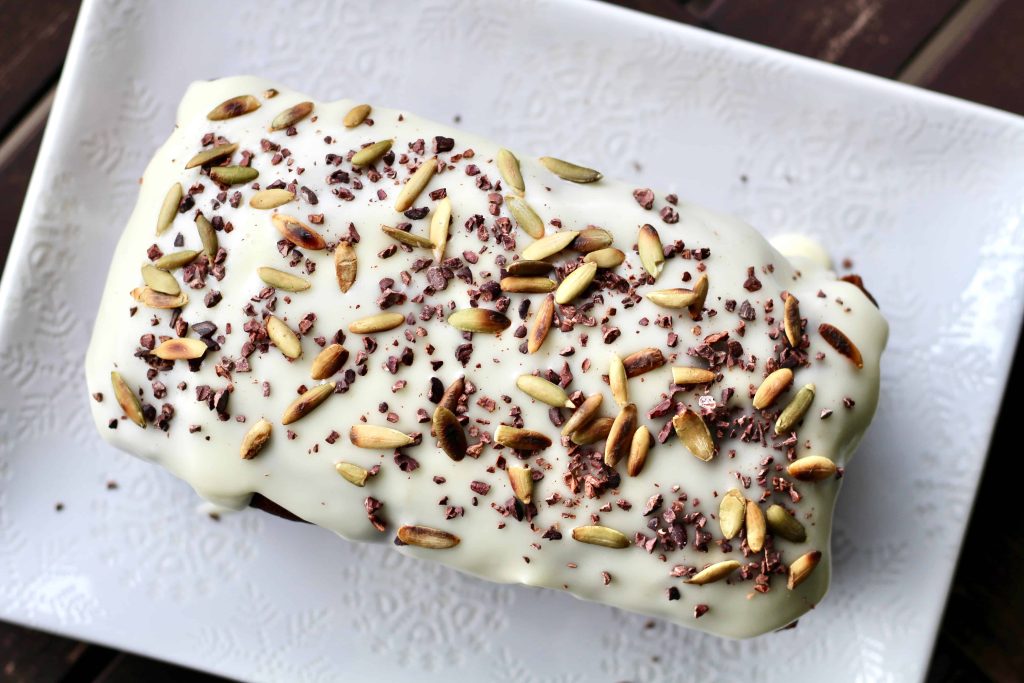
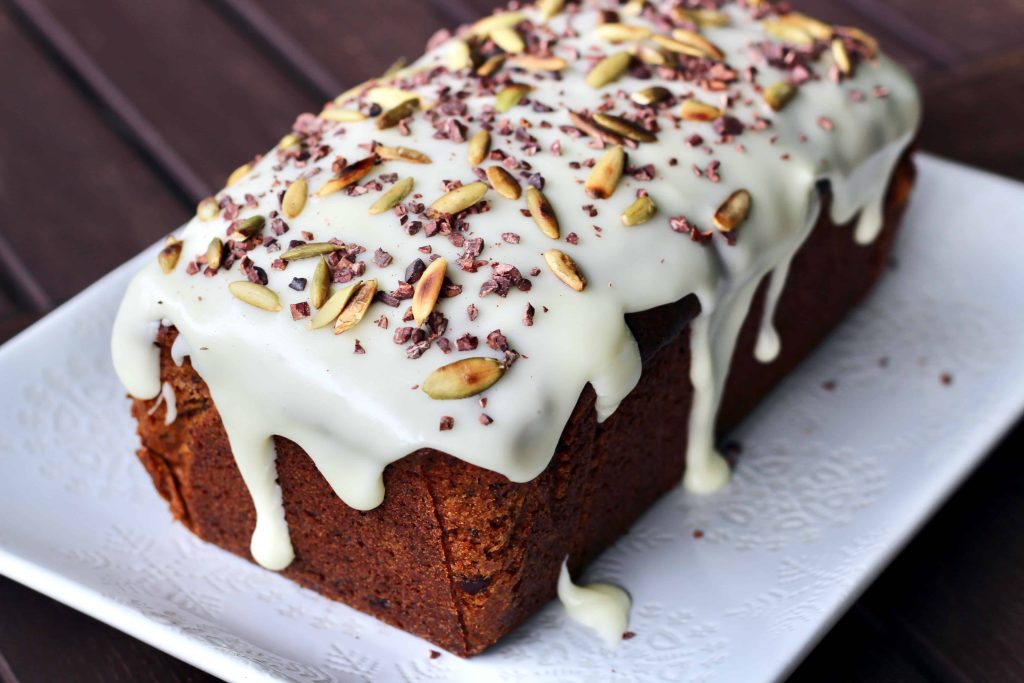
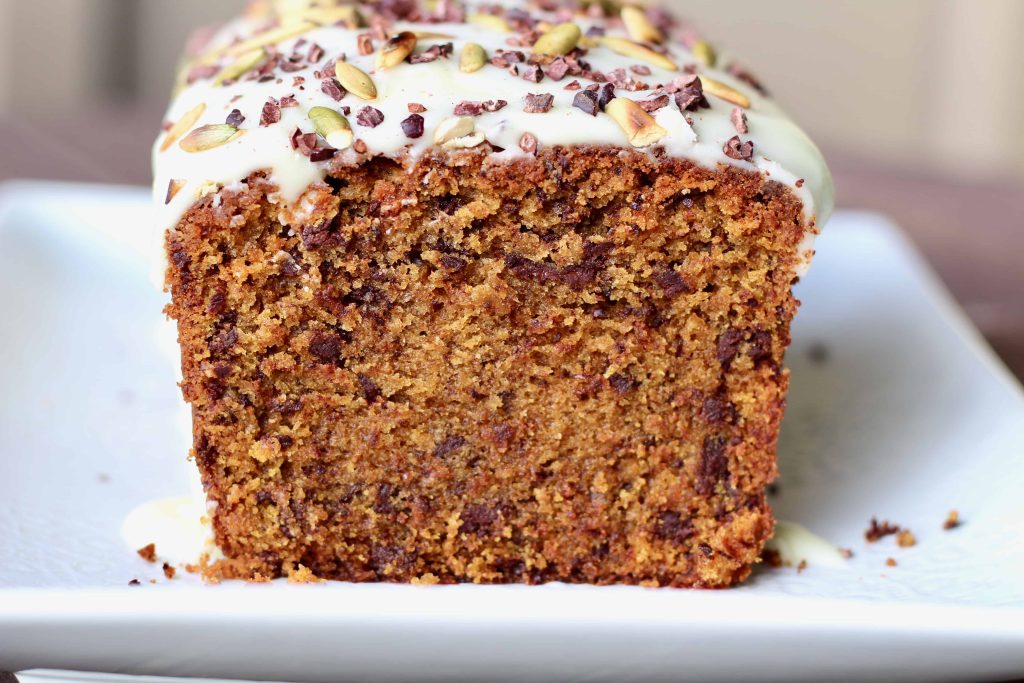
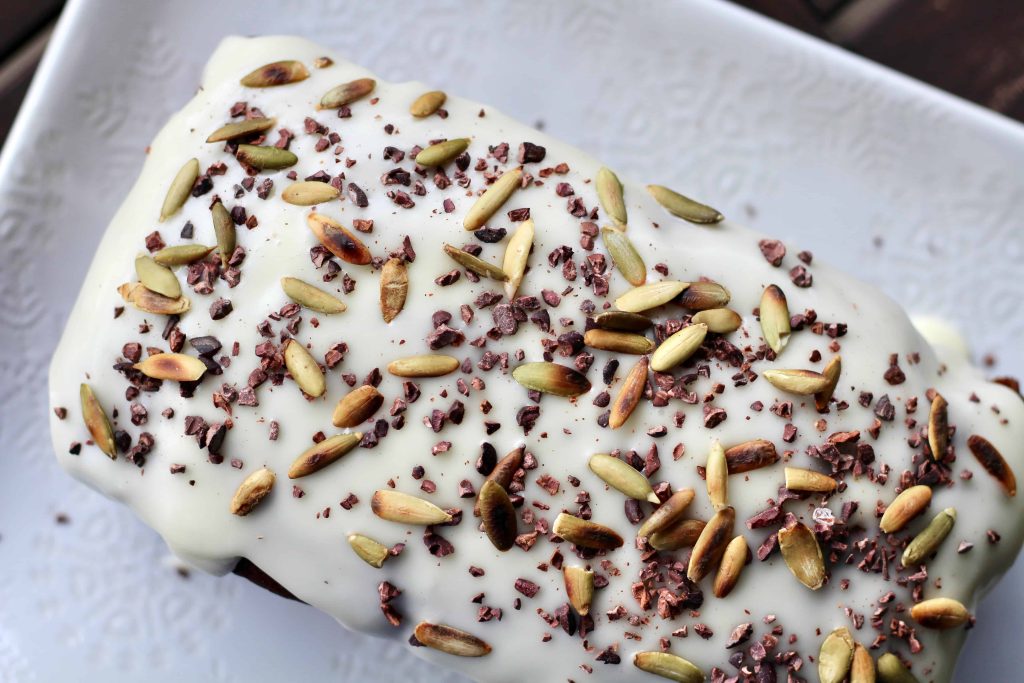
This loaf falls right in line with my pull towards recipes with a little twist, whether that be a unique ingredient, flavor combination, or re-imagination of a classic. The warmly-spiced, chocolate-laced loaf cake is topped with toasted pumpkin seeds and crushed cacao nibs, which add a pleasing bit of textural contrast and a visual pop. I honestly cannot say enough– this is one of my favorite cool-season recipes in a long time, one that I’ll continue making every year. It’s a cozy loaf that you’ll love any time between September and New Year’s (Valentine’s Day, maybe even?) for breakfast, brunch, snacking, dessert, or all of the above.
Butternut, Olive Oil, & Bittersweet Chocolate Cake
Adapted from Food52 • Yields 8 servings
For the cake:
- 225g (about 1 cup) butternut squash purée – see instructions below
- 1-2 tablespoons extra-virgin olive oil for drizzling squash, plus 225mL (about 1 cup) for the batter
- 1½ cups (180 grams) all-purpose flour
- 1½ teaspoons baking powder
- ½ teaspoon baking soda
- 1 tablespoon ground cinnamon
- 2 teaspoons ground nutmeg
- ¾ teaspoon kosher salt
- 1⅓ cups (265 grams) granulated sugar
- 3 large eggs, at room temperature
- 8 ounces (230 grams) bittersweet chocolate, finely chopped in irregular pieces*
*It looks like a lot of chocolate, but it’s just right! It’s great the have different sized bits of chocolate, including the “dust” from chopping
For the olive oil glaze:
- 1¼ cups (150 grams) confectioners’ sugar, plus 1-2 tablespoons if needed
- 2 tablespoons hot water
- 2 – 2½ tablespoons extra-virgin olive oil
For the garnish:
- 3 tablespoons pepitas (pumpkin seeds), toasted in a toaster oven or skillet for about 5 minutes or until golden and puffed
- 1 tablespoon crushed cacao nibs
Prepare the squash:
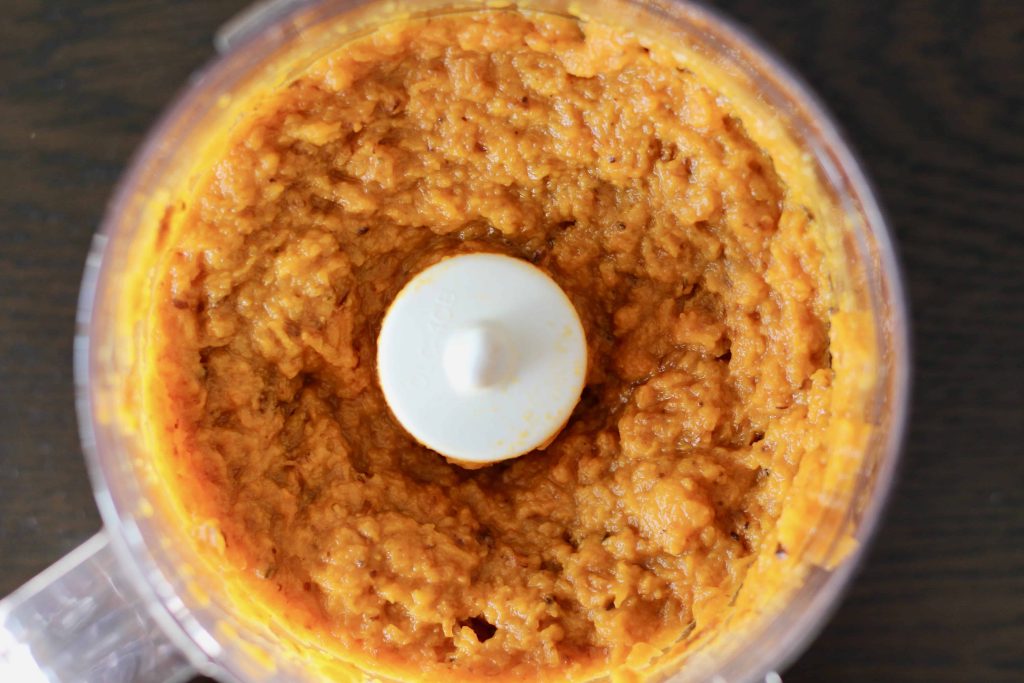
To roast pre-cut butternut squash cubes: Toss 1 pound of pre-cut cubes in about 2 tablespoons of extra-virgin olive oil and spread them out in a single layer on a foil-lined rimmed baking sheet. Do NOT add salt or other seasonings. Roast for about 30-40 minutes at 400°F, or until the cubes are tender and lightly browned. Let them cool on the sheet pan, then transfer to a food processor and purée to a chunky-smooth texture.
To roast a whole piece of squash: Once you’ve sliced the squash in half and scooped out the insides (you need a 1-pound piece), drizzle the flesh with olive oil and place it cut-side down on a foil-lined rimmed sheet pan. Roast it at 425°F for about 30-45 minutes, or until very soft and beginning to caramelize on the edges. Remove the pan from the oven and let the squash cool completely, then scrape out the flesh and purée to a chunky-smooth texture.
(Incidentally, canned butternut squash purée is available in some grocery stores, particularly in the Fall/winter, and while I haven’t tried it in this recipe, I suppose it could work here in a pinch, though I imagine freshly roasted squash would taste better. If you try it, I would suggest adding an extra tablespoon of olive oil to the cake batter since you’re not roasting the squash with oil as above. Also please let me know if you try using canned purée– I’m curious to know how it would compare.)
Measure out 225g of your butternut purée, regardless of how you got here. Scoop it into a fine-mesh sieve set over a bowl and cover it with plastic wrap. Pop it in the fridge for at least 6 hours, or up to overnight to drain the excessive liquid. Let it come to room temperature before proceeding.
Make the cake batter:
Preheat an oven to 325°F and set a rack in the center position. Line a 9″ x 5″ loaf pan with a large piece of parchment paper so that the sides hang over the edges of the pan.
Whisk together the flour, baking powder, baking soda, cinnamon, nutmeg, and salt in a large mixing bowl, and make a well in the center. In a separate bowl, whisk the sugar, olive oil, squash purée, and eggs until thoroughly combined. Pour the squash mixture into the dry ingredients and whisk until just combined. Add the chopped chocolate and gently stir it into the batter.
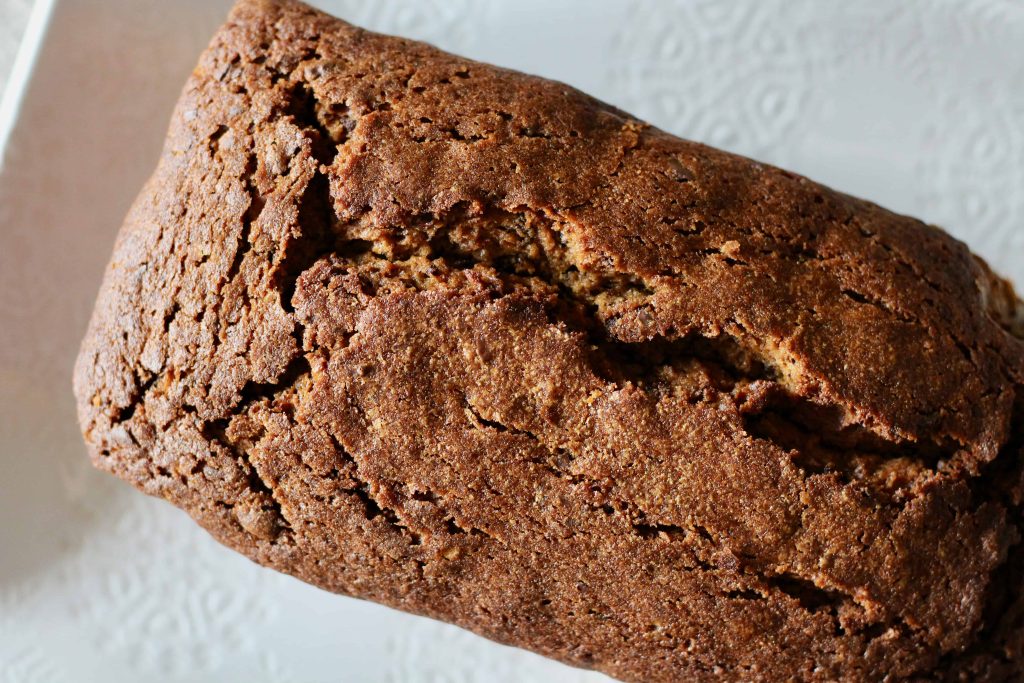
Pour the batter into the parchment-lined pan and bake until the loaf is well-browned on top and a wood skewer inserted into the center of the cake comes out clean, 75-95 minutes. Make sure to check several spots, including where the loaf splits on top, which tends to take longer to bake. (It’s a bit difficult to determine doneness due to the melty chocolate.) Transfer the pan to a wire cooling rack for 20 minutes, then pull the loaf up and out using the parchment handles. Let it cool completely on the rack.
Make the glaze:
While the cake cools, whisk the confectioners’ sugar with 2 tablespoons of hot water in a small bowl to form a thick glaze. Adjust the thickness by adding more confectioners’ sugar or water a little at a time as needed to create a smooth glaze with the consistency of honey. Drizzle in the olive oil while whisking constantly– it will create a somewhat elastic-looking consistency. If the glaze seems oily, whisk in a bit more confectioners’ sugar.
Pour the glaze over the top of the cake, using a small offset spatula if needed to coax the glaze outward so it drips over the sides. Sprinkle the cacao nibs and pepitas evenly over the top and let the glaze set completely about 1-2 hours before serving.
The loaf will keep for several days stored in an airtight container at room temperature. I like it best on Days 2-3 when the flavors have fully developed.

© Dafna Adler & Stellina Sweets, 2021.