


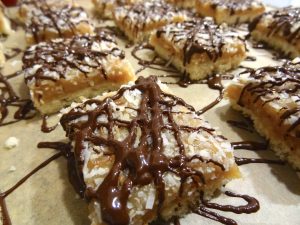
Move over, Girl Scout Cookies– you’ve got competition. During my summer visit to BAKED in Brooklyn, I discovered the glory that is Caramel Coconut Cluster Bars. Among the treasure trove of treats that I brought home was this amazing little gem, an homage to the classic Samoa cookie: a layer of gooey, coconut-laced caramel crowning a buttery shortbread cookie, topped with toasted coconut, then drizzled with chocolate. It also had a thin layer of chocolate on the bottom, though the bars didn’t look individually dipped; for the life of me I can’t figure out how they achieved that. At any rate, it’s one of the best things I’ve had in my entire life, and I was beyond thrilled that the recipe was included in Baked Elements!
 This was my bar from BAKED for comparison. (I like a little more chocolate on mine!)
I was so excited to try these at home– it was the very first recipe I tried from the new book when it was published in September. I noticed that the book version was slightly different, most notably with the bottom chocolate layer. (The home version calls for dipping the bars individually in melted chocolate.) No matter, I was determined to produce some exquisite bars of my own! These are a two-day project for me, as they involve toasting the shredded coconut, making the shortbread crust, making the caramel, assembling the bars, cutting the bars after they cool, and finally dipping each one in melted chocolate. Make no mistake– they are unquestionably worth the effort! I had two challenges with this recipe: the shortbread and the caramel. TWICE…

As I have discussed in several blog posts before, sugar work has always been a challenge for me. I’m in the process of learning the underlying chemistry that dictates the texture, consistency, color, and flavor of caramel, but it’s a work-in-progress. Many times I feel like I have little or no control over this capricious beast. Unfortunately, this recipe was no exception! However, last week I attended a fabulous candy-making class where I learned a tremendous amount about sugar mixtures, which helped me quite a bit on this third attempt to make Caramel Coconut Cluster Bars.
This recipe uses a candy thermometer, so I tried to stick to the temperature instructions as closely as possible. Unfortunately, this resulted in an overly dark, way-too-chewy caramel on the first two attempts, not nearly reminiscent of the divine texture of the bar I tasted from BAKED. The temperature of 250°F was too high to yield the light color and soft chew of the original. I also found that my shortbread texture was off; the process of making it seemed uneventful enough, though I was concerned that I had over-worked the dough. It looked fine coming out of the oven, so I proceeded with the bar assembly. When I cut them in preparation for dipping after they had cooled, I found that my crust was very dry and crumbly. When I dipped them in melted chocolate, large chunks of shortbread broke off of the bottoms of the bars; eventually my bowl of melted chocolate became muddled with a mess of cookie crumbs. The bars still looked pretty from the top and tasted good, but they were difficult to eat due to the tough, chewy caramel and the cookie which would crumble upon the most careful bite. Not an acceptable version of these magnificent bars!
 Attempt #1: Rock-hard caramel + crumbly shortbread = no bueno.
I was broken-hearted and couldn’t bear a third Samoa failure, so I had to put the recipe aside for a while. But now, Caramel Coconut Cluster Bars are this week’s Baked Sunday Mornings assignment… I was both apprehensive and determined, hoping that the third time would be the charm! I once again embarked on a valiant adventure to recreate BAKED’s bars, though I planned a few small, yet significant, deviations from the recipe, based on the results of my first two subpar experiments.
 When making the shortbread, I was extra careful in handling the dough while mixing and patting it into the baking pan. The dough is extremely sticky, and I found myself re-flouring my hands several times (though I doubt there was enough extra flour to cause the crust to be dry). My 350°F oven was ready and waiting for duty, so I slipped the pan in and crossed my fingers. The baking time is 25-30 minutes; the previous two times I took my shortbread out after the minimum 25 minutes, so this time I took the pan out after 20 minutes. I was optimistic, as the top of the crust was a pale gold color and had a firm, yet, slightly soft texture.
I then moved on to the dreaded caramel. With this recipe, you must heat the sugar mixture twice: once to melt the sugar and combine the ingredients into a syrup, and again after adding the butter and heavy cream. Both times, the recipe instructs to heat it to the range of 240-250°F. I knew I would not go this high, because that temperature range would result in tough, dental-hazard caramel. I learned in last weekend’s candy class that achieving the right type of sugar mixture is truly an art; pastry chefs often use candy thermometers as a guide, but they have gained an instinctive feel for the color, aroma, and texture of the mix. The thermometer can sometimes lead one astray!
For the first round of heat, I was directed to remove the pan from the burner when it took on a hue of “amber”. This seemed a little ambiguous since there was brown sugar in the mixture and it was amber already, so the thermometer was very useful here. The sugar was bubbling furiously and smelled very sweet– no burning. Meanwhile, there is one more multi-tasking step: you need to gently heat up a mixture of heavy cream and sweetened condensed milk in a separate saucepan, without boiling. I anxiously kept the sugar going until the thermometer read about 237°F (while keeping an eye on the cream), at which point I turned off the heat and added the butter and cream mixture. The heating process took about 8 minutes or so. The bubbling brew didn’t sputter as much as I expected, but I stirred it together anyway and turned the heat back on.
 Keeping in mind the color of the caramel in BAKED’s version, I watched the thermometer climb very slowly… Several times I was tempted to stop because the temperature didn’t seem to be moving much, especially in the mid-220°F range. I stirred it slowly on occasion to make sure the temperature was consistent throughout the pan… tick-tock. After about 15 minutes, the sugar finally hit 235°F. It was a gorgeous, golden blonde shade of caramel with a semi-thick consistency at this point. The mixture sputtered and frothed in protest when I added the vanilla extract, but I steeled my nerves and kept stirring it in. Finally, I folded in the toasted coconut, which melted beautifully into submission.
 It’s important to work very quickly when adding these last ingredients because the caramel changes rapidly at this stage. I poured the coconut-caramel over the shortbread cookie crust and spread it evenly to the edges with a small offset spatula, then sprinkled the remaining toasted coconut over the top and pressed it in lightly. I examined my baking pan with all my senses: the color looked right; the aroma was heavenly– no trace of burnt caramel; the texture felt as though it would not harden like my first two attempts. (It was silent and I couldn’t taste it yet, so those senses weren’t as helpful.) I walked away feeling very hopeful and possibly with a slight spring in my step.
 I checked on The Precious several times as it cooled, and in fact, the caramel seemed to maintain a soft texture– things were looking good! After cooling to room temperature, I was instructed to put the pan in the fridge, but I decided to leave it out on the countertop overnight, lest the caramel harden too much…
The next morning the pan was in the same state in which I had left it, and when I revisited it that evening after work, I was ready to melt the chocolate and cut the bars for dipping. I held my breath; I still didn’t know what tricks the shortbread had in store for me. I remembered that when I tried to cut the first two batches, it felt like I needed a saw. This time, my chef’s knife pierced the caramel’s perfectly soft surface with little resistance, yet it completely held its shape! 🙂

The shortbread… well, it was slightly less dry and crumbly, but still dry and crumbly. *sigh* The buttery flavor was fantastic, but I knew the crust would again fall apart if I tried to dip the bars in chocolate. So I had to adapt my chocolate method a bit– I was determined to make these work!
I flipped the bars over carefully so that the bottoms faced up. Instead of dipping the bars into the bowl, I was going to pour the chocolate over them, them flip them back over– a little backwards, but I was confident that it would work. I poured the melted chocolate into a liquid measuring cup and poured a dollop of chocolate onto each square. I then flipped each one over gingerly and placed them on a cookie sheet lined with parchment paper. In placing them chocolate-side-down, the chocolate then spread out to cover the bottom of each square.
 The final step was to drizzle chocolate over the tops, which I would normally do with a small pastry bag. Since I was already using a chocolate-covered measuring cup, I poured the remaining chocolate in a thin stream straight from the cup. The pan then went into the fridge to firm up the chocolate for 15 minutes… Et voilà, my bars were done and beautiful! 🙂
 Overall, I am pretty stoked about these bars, as caramel has always been tricky for me. I am over the moon about this caramel– it is rich, dreamy, and perfectly chewy (similar to soft candy bar caramel). The temperature modifications were the key to success with this recipe. The shortbread, while delicious, still needs some work. I am considering reducing the oven temperature to 325°F, researching how to modify the ingredients slightly, or I may use a different shortbread recipe altogether next time.

Here are some tips for success with this challenging recipe:
- Take your caramel no higher than 235°F
- Have all your caramel ingredients ready before you start, as you have to work quickly once your sugar is heated
- Melt the chocolate gently over a pot of water on low heat to avoid scorching
- I found that 2 heaping cups of coconut is plenty for the caramel and topping
- Do not refrigerate the bars (except for the 15 minutes needed to set the chocolate)
These bars take some practice, but boy, are they worth the time and effort!! Visit Baked Sunday Mornings for the Caramel Coconut Cluster Bars recipe, and check out the shenanigans of my fellow bakers. Girl Scout cookie fans rejoice! 🙂

20 Responses
They look perfect! 🙂
Aww, thank you, Sarah! 🙂
Your bars are beautiful!! Good idea turning them upside down to coat the bottom. I dipped mine and it was messy. Your bars do look great. I agree about the temperature of the caramel. It was impossible for me to get the temp back up to 250. The closest I got was 240 and that took a long time.
Thanks! I couldn’t think of another way to get the chocolate on there, having used the dipping method twice before and ending up with crumbled cookie mess! Yeah, the caramel temp is so tricky– it’s really hard to know sometimes. I think this is one of those things where practice makes perfect! 🙂
YOU. ROCK. Loved your blog, as usual… and you and I had a lot of the same suggestions. I’m jealous of your beautiful soft caramel. Mine is edible, but it definitely sets my poor jaw’s TMJ in motion when chewing. Uck. I took the caramel to about 240 and not much higher (if at all), but I think 235 is the magic degree.
FYI, I actually baked my shortbread closer to 30 minutes and it was very golden brown. I was panicked about how much it baked, but honestly, I think it helped me in the end. Nonetheless, I think no matter how long you bake it, it’s a crumbly shortbread that’s gonna shatter a bit upon cutting.
Good job, and as always, I love the voice of your text – and again, feel we are baking twins. Love it. I wish you were hitting Baked with next Monday, but I know you will be with me in spirit… as I know practically all our BSM friends will be! I can’t wait to share my Baked experiences this week with everyone!
No, YOU rock! 🙂 Yup, once again we had very similar experiences. I had the same result with the caramel the first two times– gnawing on rock-hard bars is not pleasant… I suspect you would have a much different batch at 235F, if you feel inclined to make these bars again at some point. I’m wondering if this would be a good go-to caramel for other recipes too. For example, one of my all-time favorite thing to bake is the Gooey Caramel Butter Bars from the “Sticky Chewy Messy Gooey” cookbook. They are amazing, but I’m not crazy about the fact that you make the caramel by melting Werther’s candies (before I knew how to make it from scratch). I would like to replicate that type of caramel, but I’m not sure how to go about it. The shortbread crust, however, is divine and comes out perfectly every time. I’m curious to know if it would work with the BAKED caramel, but in the other recipe, the crust gets baked twice, once before the caramel and again after pouring it on, so it’s a little different (though the ingredients are similar).
That’s interesting about the shortbread baking longer. I would assume that it would get dryer the longer you bake it, but perhaps that is not the case. You’re probably right though, as most of the bakers seemed to have crumbly shortbread…
Thank you as always for your complimentary remarks– I am humbled and appreciative. Baking twins, indeed! 🙂 I knowwwwwww, I can’t tell you how much I wish I was going with you to BAKED– especially since Matt will be there. I know you’re going to have an amazing time and will fall in love with the bakery and Red Hook. I can’t wait to hear all about it!! 😀
OMG! Looking at your post made me want to make these all over again! Your photos are great and your bars look perfect! I skipped the dipping part thinking it was too messy.
Aw thanks, Susan! Yours looked great as well, and I think it’s perfectly fine to skip the chocolate layer. 🙂
Beautiful bars! Great read!
Thank you and thank you! 🙂
Did you use the 2 cups of coconut for this set of bars? I was looking at your beautiful pics and wondering how in the world you got your coconut to mix into your caramel so well!
I used a total of 2 heaping cups– about 2/3 of it went into the caramel and the rest on top. The first two times I had tons of coconut left over from the 3 cups. Hmm, it was pretty easy to stir into the caramel, though it might have been higher with my previous higher-temp caramel. Thank you for the photo compliment– I seriously took almost 100 photos from all different angles. One might say I’m a little obsessed with getting the right shot… 😉
These are on my radar to make again – so much potential. And I’m definitely going to follow your caramel suggestions!
I’m thinking the lower oven temp might help your shortbread problem, good idea. And maybe start checking it early, take it out by how it looks instead of by time?
YES, so much potential, indeed! I knew I would make these again after the first two attempts, but I had to put them aside for a while. Double failure with such a delicious recipe is so traumatizing– LOL! 😉
I’m going to look more closely at the other shortbread recipe that I use for similar bars to see if I can figure out how to alter the cooking time/temp/ingredients. I am pretty determined to make these perfect… eventually!
Beautiful! Great suggestions…I feel like I had an advantage since you and Mark shared your caramel and shortbread issues before I had a chance to make these. So may you both share in my success! 😉 Also – I agree with the 2 cups of coconut being plenty!
LOL– thank you and you’re welcome! 😉 I probably would’ve made them according to the recipe the first time as a “control” experiment, so you’re smarter to use people’s suggestions! Hey, that’s why this group is so great– I’ve learned so much from reading other bakers’ blogs, including yours. 😀
I had the same problem with these bars on the caramel. The 240-245F temp is too high. It makes the caramel closer to a hard ball or hard crack stage. So frustrating!
Yeah, it took me a few tries to realize that I needed to make an adjustment. Did you end up trying again? They are so worth it!