


Ah, sugar… We meet again.
I have posted several recipes chronicling my love-hate relationship with sugar; it is one of the most difficult ingredients to work with, in my experience as a home baker without a chemistry background. (Sorry, high school Chemistry was a distant, painful memory. Also, I don’t recall that we ever made caramel, but maybe that would have piqued my interest a little more…) I am fascinated by baking science, which is, in fact, all about chemistry! Over the years, I’ve tried a multitude of recipes for various caramel/candy treats, some of which have been successful, while others were flaming disasters. (Figuratively, not literally.) What frustrates me is that I don’t have a good grasp of the underlying principles that govern the behavior of sugar when heated and combined with other ingredients. The molecular structure of sugar is rather chameleon-like and often finicky, depending on what you add to it, and one of my goals in writing this blog is to learn more about it and gain a firm understanding of said chemical properties.
I’m torn on whether or not I prefer recipes that use a candy thermometer versus those that rely on the color of the sugar mixture to dictate doneness. Thermometer recipes theoretically should be more precise, but sometimes I feel beholden to the thermometer, even though the mixture seems to be progressing more rapidly. I have definitely burned my share of caramels while waiting for the thermometer to catch up to the sugar! However, judging by color can be very subjective, so that’s not a perfect science either. Successful pastry chefs have an instinctive feel for their bubbling sugar, and that’s what I’d like to work towards.
Along my baking journey of the past decade, I have taken a number of baking classes at a number of cooking schools and kitchens. Most of them featured a few recipes with instructions on how to make them, plus a little background about the ingredients or preparation methods. Very few such courses delve into the science behind the magic; one of these refreshing exceptions is Baking Arts in San Francisco. Operating out of a spacious loft in the South of Market neighborhood, Baking Arts is run by one Richard Festen, who specializes in spectacularly decorated celebration cakes. He offers courses on cakes, cupcakes, cookies, chocolate, pastries, various doughs, and decorating techniques, and I must say that I’ve learned quite a lot from him over the years. I’ve taken several of his courses, most recently his candy-making class on Toffee & Nut Brittles. After the frustration I experienced while making Toasted Pumpkin Seed Brittle a few weeks ago, I decided to consult a more knowledgeable source to demystify my sugar troubles; it was time to reach out to Richard. What I love about his classes is that I not only walk away with new recipes and techniques each time, but more importantly, I learn SCIENCE. I leave his kitchen just a little more nerdy every single time… 😉
Richard used to be a biochemist, but he jumped ship for pastry school at one point and has been leveraging his chemistry background to create amazing confections ever since. Therefore, he infuses his teachings with plenty of scientific explanations about molecules, chemical reactions, and emulsions. Oh, and lots of sarcasm. But I don’t think he learned that part in college or pastry school…. Anyway, I signed up for this candy-making class in the hope of learning more about why my sugar mixtures are so inconsistent and fussy. I definitely came to the right place! The recipes we made were Buttercrunch Almond Toffee and Peanut Brittle, both of which were A-MAZING. There were only four of us in the class, crowded around Richard’s gas burner as he demonstrated the sugar techniques. We then made our own batches in pairs, and his personal attention with such a small group allowed for asking questions, close sugar supervision, and lots of helpful tips.

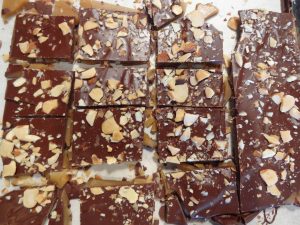
I will post the toffee (left) at some point and the brittle (right) recipe is in a separate blog entry, but for this post, I want to focus on tips and techniques for successful sugar work.
Things I already knew, mostly through my own sugary trials and tribulations:
- Always have your ingredients measured, set out, and nearby when working with sugar because you need to work quickly; the state of sugar changes rapidly and you may not have time to retrieve other items.
- Avoid interaction of sugar crystals with your bubbling syrup mixture, as this may cause the whole thing to crystallize, which would lead to the death and destruction of your mixture.
- When melting sugar in a saucepan, you want to prevent buildup of sugar crystals on the sides of your pan to avoid the aforementioned death and destruction. If you get crystals splashing up, brush down the sides of the pan with a wet pastry brush.
- Stir your mixture with a wooden spoon and rinse it frequently. For example, if you stir at one stage and then later put the spoon back in the pan when the sugar has reached a different cooking stage, you may reintroduce crystals into the mixture. Again, death and destruction may ensue.
- Carefully combine the sugar and other ingredients in your pan and stir slowly until the sugar dissolves. Once this happens, STOP stirring and let the mixture boil undisturbed, unless the recipe states otherwise.
- If using a candy thermometer, make sure it is correctly calibrated. If your thermometer is off by some number of degrees, you may end up burning or undercooking batch after batch of sugar! To calibrate, test your thermometer in a pot of boiling water; it should read 212°F. If it’s higher or lower, you know to add or subtract that number of degrees when using the thermometer to cook sugar.
New tips about ingredients that I took away from the candy-making class:
- “Buttercrunch” toffee means there is equal weight of sugar and butter in the recipe. In other words: YUM.
- Lots of butter (i.e. fat) has great advantages: 1) yields toffee with a tender crunch, and 2) inhibits growth of sugar crystals.
- Recipes that contain little or no butter need baking soda to aerate the mixture and create tenderness. Without it, the candy would have an impossibly hard texture.
- Corn syrup is commonly found in brittle recipes and also inhibits sugar crystal formation.
- Caramels, toffees, and brittles start out more or less with the same process of melting sugar and a few other ingredients. At the end, if you add cream, you end up with caramel; if you add baking soda, you will have candy. Win-win!
- If your recipe calls for salt, it’s important to add it at the specified stage of your recipe. Adding it at the beginning versus the end affects the finished candy– chemistry at work!
 Left: Sugar mixture with equal amount of butter (buttercrunch). Right: sugar mixture with corn syrup and zero butter (brittle).
Techniques learned in class for successful candy-making:
- A candy thermometer is a helpful tool, but oftentimes it should be used more as a guide than an absolute rule. It’s important to learn to judge sugar mixtures by their color, aroma, and texture, as thermometers are not always perfect.
- When brushing down sugar crystals on the sides of your pan, brush with a fairly generous amount of water a couple of inches from the top of the pan, NOT right above the surface of the sugar mixture. If you brush along the edge of the sugar, you risk dipping your brush into the hot mixture and getting crystals all over the place, especially the next time you put the brush in your pan. If you brush well above, the water will drip down and wash away the crystals without getting any of the hot sugar on your brush– ta-da!
- A boiling brew of sugar and butter is an emulsion, or mixture of two liquids that normally do not mix (like a vinaigrette dressing). If your recipe calls for stirring after the mixture has come to a boil, make sure to stir *slowly*, as vigorous stirring will cause the emulsion to break and ruin your tenuous mixture. Which will probably make you want to cry.
- If you see a golden color starting to form in the sugar mixture around the edges of the pan (or other spots), this signifies that those spots are hotter than the rest of the syrup. Slowly stir to equalize the temperature throughout the mixture.
- When pouring your candy, do NOT scrape the pan to get every last bit, tempting as it seems! You may end up getting those pesky, dangerous sugar crystals from the sides of your pan into your finished toffee/brittle, which would compromise its molecular structure.
- DO NOT TOUCH your toffee or brittle while it’s cooling. Leaving it undisturbed during the cooling process allows the sugar crystals to set up properly so that your candy has the right texture and crunch. Poking, prodding, or otherwise harassing it at this stage may result in grainy candy.
I think I’m in a sugar coma just from writing this! (Or maybe from munching on toffee while writing…?) Hopefully you will find this information useful when working with sugar, especially for caramel and candy-making.
If you live in the San Francisco Bay Area, I highly recommend checking out Baking Arts if you are looking to take baking classes. You will walk away with awesome, usable recipes and an education in baking science that you can apply to your other baking adventures. (Plus, sometimes Richard feeds us leftover cake!) 😀


5 Responses
Great read! Thanks for sharing 🙂
Thank you, Jessica! I especially appreciate that from a professional! 🙂